Tuesday, March 17, 2009

Beans, Beans, the magical fruit...

Yes a whole class on beans...beans in their usual sense in chili to a twist on a chinese black bean dish to an unusual sense in a cake. Well, I take it back. If you're a dedicated asian food eater then bean cake isn't too weird. But to the majority of the class, bean cake was a bit strange. For me I grew up eating beans in many forms - my favorite is in a filipino dish called hopia. Right now, I have a rendition of bean cake with vanilla and lemon in the oven...mmm...smells good...

No pics...I've been eating before I remember to take some...

The highlight of class - well highlight for me, sad day for my classmate - was the ultimate kabashing of free form cooking. At the beginning of each class, we go around the room to discuss what we've cooked in the previous week. Apparently, cooking novices should stick to recipes as the instructor wouldn't even begin to tell my classmate what she had done wrong with her no-recipe-chicken-bake-disaster (I'm only going to say that the heavy cream curdled). After her long story of her process, she asks, "what did I do wrong?". Our instructor pauses and says, "Everything...it's ALL wrong. Stick to recipes." Looking back, it wasn't as painful as it felt (ok, it was a bit embarassing for her) as using recipes really teaches you good proportions, flavor profiles, and basic technique.

TIP: Use red kidney beans in your tuna salad instead of mayo. It's AMAZING how they make you think there is mayo due to the creamy texture of the beans - but they're so much healthier. I'll include our recipe from class...


Red Bean & Tuna Salad (serves 4)
  • 2 c. red kidney beans, rinsed & drained
  • 1/4 c. pure olive oil
  • 2 TB fresh lemon juice
  • Freshly ground pepper
  • 1/4 c. finely chopped green onions
  • 2 TB Italian parsley, finely chopped
  • 1 7-oz. can tuna, drained & flaked using a fork
  1. Combine lemon juice, pepper and oil and pour over beans.
  2. Add green onions & parsley and gently toss together.
  3. Add tuna & serve.
Bada-bean-g! (Yesss...I did it).

Wednesday, March 4, 2009

If you're delinquent, raise your eyebrows...

A filipino trait...that I can do in a slightly hyper state...I raise mine unendingly as a delinquent blogger.

After tonight's class, I will be 3 (count 'em three) posts behind. Fear not, I will catch up ASAP.

I just didn't want you to think I forgot about you. Oh so much inspiration this past week and it's all fitting together so nicely...something like puzzle pieces. :)

See you soon...

Sunday, March 1, 2009

Please sir...can I have some more?

The collection of stocks we made during this class...

Vegetable Stock

Enhanced Beef Stock - the boxed kind, just made better

Chicken Stock

Soups on! Well, at least this week in Basics class...we touched on how to make homemade stocks, how to improve boxed stocks, and a few simple soups to use as a foundation for creativity.

This class was full of small tips...
  • Raw parsley is the best breath freshener...hands down
  • It takes 3 weeks for tastebuds to re-sensitize after training them to want salt - hence don't oversalt! Food will taste bland for those 3 weeks but then you'll actually start to TASTE the food. (Trust me, I did it since I cook with a bland eater and now food tastes different...actually, incredible)
  • Beef broth is not worth making from scratch. It takes hours upon hours...so use that carton proudly!
  • 212 degrees is the temperature where ultimate flavor is extracted. Basically bring your stock to a full boil then turning down to a simmer for recommended cook time.
Soups is a great way to get rid of what you have in the fridge. In class, we called it the pantry soup. In class, we used what she literally had leftover in the class fridge: pepperoni, rice noodles, carrots, and spinach. We used the vegetable broth we made in class. I'll admit, it was kind of weird but tasted pretty good. Plus, it helps you figure out what to do with that extra "x" you have in the fridge/freezer.

Soups away!

Tuesday, February 24, 2009

Back to the roots...


Man I LOVE the smell of garlic, ginger, and soy...and almonds.  I am head-to-toe perfumed with the scents of tonight's class, Chinese 2 - delicate flavors.

This was a heavy hands-on experience where we discussed and had 15 minutes of lecture and technique (over a delicious bowl of egg drop soup with tomatoes) followed by rolling up the sleeves and cooking away.  Then, we all sat down and enjoyed our creations together.  Tonight, we made some simple and delicious Chinese dishes including steamed fish - my dad's favorite.


Our chef instructor was very open, excited, and taught asian cuisine in the best style - through family stories.  The group was small - and even included a sweet asian grandmother very reminiscent of my own.  Oh how I miss you grandma...grandma used to tell me, "Eat! Eat! Don't wait for hungry!"  She would be so proud that I allow myself endless amounts of food...but then again, I'm slightly hypoglycemic.  NOTE: I found out later that this was a little bit due to her PTSD from living through WWII in the Philippines - so much makes sense now that I'm "an adult".  

The most exciting part of class was cooking in the actual kitchen of a popular asian grocery store/eatery - there was a whole set-up that I shall call the range of woks.  4 commercial sized woks fueled by gas...each with a faucet above for quick and easy cleaning between dishes and a convenient trough behind the woks to dump the water.  Stainless steel tables and tools everywhere - I was psyched out of my mind.  Chef was very hands-on and encouraging of our thoughts on taste and seasoning.  It was really empowering to have a knife in hand - a side note and pat on my back: I was told I was a great mince-r.  

Nothing too out of the ordinary happened.  It was a great class with great food and great people.  Although, I'm also suffering from Crisco overload - oh, the almond cookies...I think I ate 4 or was it 5?  


TIP: Hot and Sour soup rarely precede a full Chinese meal as they are heavy and more like a snack...lighter soups like egg drop are more typical (and in my opinion more delicious).

Tomorrow is basics 2...I have no idea what the topic is but we'll both find out soon enough.  Ta ta...

Sunday, February 22, 2009

pizza...mangia...bene :)

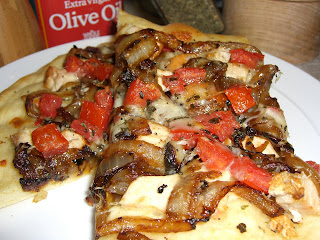
So I got some flack for talking about a pizza and not posting any details. With pizza being one of my favorite things to make, I knew it wouldn't be long 'til it reared it's delicious, pretty head again. I grabbed my camera and captured it before its species became extinct.

My pizza dough recipe comes from my absolute favorite tv chef with no-fail dishes, Giada DeLaurentiis. Her Roman Pizza was my first homemade pizza recipe. I use half of the dough recipe for a perfect, 2-person pie - always in the traditional Roman, rectangular style, of course. Giada ignited my addiction and the topping creativity went haywire. Tonight's was inspired by "what can I make without having to go grocery shopping".

Below is the mangia-licious magic from tonight...it's garlic seared chicken, caramelized onion, 3-cheese, tomato with a herb-butter base.
The only problem is...I have no specific recipe to share. This was a true, intuition driven dish - how annoying, I know. I can give you the basics though.

Serving size: 4 slices (enough for 2 servings)

For dough, use recipe ala Giada DeLaurentiis Roman Pizza (see above)
I highly recommend a pizza stone and peel if pizza is going to make a usual occurrence. It gives the crust that nice crispy outside while being soft and chewy inside. (Hugs to my dearest aunt, uncle, and cousin for mine!)

Topping ingredients:
  • Olive Oil - I use Extra Virgin
  • 1 clove of garlic, minced
  • 1 boneless, skinless chicken breast
  • 1 medium sized onion, sliced in half moons about 1/4 inch thick
  • 1 roma tomato, de-seeded and chopped
  • Smoked mozzarella, fontina, and parmigiano reggiano (these were basically what I had leftover from the Roman Pizza, use whatever you got)
  • 2 TB of unsalted butter
  • Basil, Oregano, Parsley to taste (or an Italian herb mix if you like)
Instructions:
  1. Make your dough, as it needs to rise for an hour.
  2. Over medium heat, saute olive oil and garlic until golden.
  3. Season chicken breast with seasoning salt (I like Johnny's) and pepper. Sear in pan of oil and garlic. Cook for 2-3 minutes before flipping. Cook until chicken is done - you tell by pushing the center. If it's squishy then it needs to be cooked more...if it resists and bounces back then you're pretty good. TIP: Be sure to let your chicken rest for at least 5 minutes before chopping into 1/4 inch cubes. This will keep the meat from being dry - no poking or cutting your proteins while they're hot lest you wish for all the juices to run out!
  4. In the same pan, heat 1 TB of olive oil over medium heat. Add onions and lower heat to medium-low to caramelize for 5-8 minutes. Keep turning to prevent burning.
  5. In a small saute pan, melt butter and add herbs. Keep on lowest heat to stay warm.
  6. When dough has doubled after an hour of rising, punch it down and roll it out on a floured surface - I prefer a rectangle. If using a pizza stone and peel like I do, sprinkle peel with cornmeal and transfer dough onto peel to build pizza.
  7. Brush dough with herb butter leaving 3/4-1 inch around the edges. You can sprinkle some garlic powder too if you want a vampire scaring punch. Add to whole pizza: chicken, onions, tomatoes followed by cheeses. Sprinkle 1 tsp. dried basil on top. I also drizzle extra herb butter on top paying homage to Paula Deen.
  8. I use a pizza stone to cook my pizza so heat it for 15-20 minutes at 500 degrees. Turn it down to 450 degrees and cook pizza for 10-11 minutes.
  9. I finish it with a few turns of black pepper and serve away!
The hubbs called this my "best one yet" and ate his 2 slices before I could even finish the first. Call it my mad scientific observation skills but I think he liked it.
A note: this was the first time I articulated a "how it feels" recipe so I hope I didn't leave out anything too important. I promise to take any feedback graciously. :)

Get inspired and just throw whatever you like on top...I've done american norm of pepperoni to veggie goodness to something less traditional like tonight.

Buon appetito! See you after Tuesday's Chinese class...

Thursday, February 19, 2009

The Basics...

"Some call this tool a chopper but you would never use it for chopping.  See?  It's too dull.  It's best used for this - as a scraper."  
The thought of someone actually using this block edged tool for chopping is fairly amusing.  I picture a tomato being squished to hell in one fatal blow.  Seeds and juice abound the stumped victim who stares at the box wondering why it would be labeled as a chopper if it's not intended to be used this way.

I start this blog out of encouragement from dear friends (L, A, & M) and as an outlet and description as I make my way into the world of food - particularly, cooking outside of my own kitchen.  I have a deep felt infatuation with all things edible - yes, even my run in with you, Mr. Sea Cucumber.  After years of recipe mining, trance-like observation of handfuls of favorite tv chefs, and self-taught adventures in my various homes, I've decided to step out into the world of hands-on training and face-to-face education from classically trained chefs all around the city.  

My first class is a series--basics.  We review aspects of a meal at each class. This week, we started off with salads.  

I surprisingly realized I am in the high range of skill level for my class.  Most are hopeful cooks wishing to make something their partners will eat.  Half haven't cooked much past a microwave or a bowl of cereal.  I kept my intro short stating that I was here to increase my skills and knowledge as I love to cook.  What I really wanted to say was "I'm a pretty darn good cook looking to make myself even better since my competitive nature will not allow me to do anything less."  

Our chef instructor is poised, slightly abrasive, and extremely experienced in the world of cooking, but also teaching about cooking.  And then there are the teaching methods.  Asking a question could be rebutted with "I already discussed that so will not repeat myself."  Silence.  "I have teaching methods - the first being that I will not review what has already been discussed.  If you missed something because you weren't listening or your mind was elsewhere then hopefully one of your classmates can tell you the answer."  I suddenly felt like I had time warped back to elementary school and was waiting for someone to get their knuckles slapped by a ruler - which in this case, might have been a knife (yowsa!).  From that point on, most of us screened questions to those around us.  Secondly, asking inconvenient questions will only land you to be interupted and talked over.

The odd part is that asking questions was encouraged...so...umm, yeah...

Despite this stylistic hurdle, we chopped, took notes, mixed, and tossed.  3 hours later, we had made 3 delicious and different salads.  We also learned about oils, vinegars, greens, proper washing and storing, and accompaniments to add variety based on personal preference.  Who knew I'd ever feel inspired to buy an at-home salad bar display?  

In reviewing class one, I made a delicious basic salad dressing last night to go along with my completely homemade roman style pizza - cooked on a pizza stone of course and yes, handmade dough.  What is she doing in a basics class if she can make homemade pizza?  Well, first off, you never know everything and secondly, affirmation that I'm pretty good at this gives me hope.  I'm pre-signed up for some pretty intense stuff over the next month so stay tuned guys and gals...the fun has just begun.

TIP: Un-refrigerated oil is only good for 3 months once opened - this includes vegetable (canola) and olive oils.  They get rancid after that so be wary...and buy small bottles of oil.  (Sorry Mr. garbage/recycle man, my trash is going to be insanely packed this next week.)